Overview
Foundry Virtual Tabletop includes built-in support for optional, powerful add-on modules which can change almost every aspect of the software, adding new features and content for games. Modules are managed from the Add-on Modules tab, and are toggled on or off from within game worlds. This article will go over the process of installing, updating, and activating them for your games.
Though modules are generally safe to use, we strongly advise some caution when selecting modules to use for your games. Utilizing too many modules, or using modules that are heavily out of date can cause instability (and rarely, data loss). If you are experiencing unwanted behavior or issues with your Foundry game worlds, disable your modules and see if the issues persists. If the issues only occur while modules are loaded in your world, further investigation of your module list will likely reveal the module(s) responsible for causing the issues.
Add-On Modules Menu

To view all currently installed modules from the main menu, click on Add-on Modules to load the module management tab. From here you can manage any currently installed modules, as well as install new modules.
Modules are marked with various tags, which detail aspects about them, and provide guidance on what version of Foundry VTT they are meant to work with.
It is recommended that you only use modules meant for the current version of Foundry Virtual Tabletop you have installed. Modules that are meant for older or newer versions that what you have run the risk of failing to function, causing errors, strange behavior in game worlds, or at worst may result in data loss.
Module Tags
In the module lists entries will have multiple colored icons that provide at-a-glance information about the module. The most common tags are:
- denotes the presence of localization changes, which adds new or changes existing text strings which may affect the UI, game system, character sheets, etc.
- denotes the presence of at least one compendium, this is common for modules which provide new content such as scenes, actors, journals or sounds.
- denotes a compatibility warning. Modules with compatibility warnings may still work with the installed version of Foundry, but were specifically built for a different version of the software than what is being used.
- denotes the version of the module that is installed.
Updating Modules
To update an installed module, click the Update button, this will check for any updates to the selected module, downloading and installing one if found. Modules that do not have an available update will be marked as "Current" briefly. Modules that are locked cannot be updated, and will not have the update button available.
It is also possible to update all unlocked modules by using the Update All button, which will check all installed modules for updates and automatically download them.
Locking Modules
Clicking the lock icon ( ) will toggle module lock on, and change the icon to a closed padlock. While the module is locked it cannot be updated or deleted.
Uninstalling Modules
To uninstall a module click the Uninstall button next to the module in the Add-on Modules tab. This will prompt you to confirm your choice. By clicking yes the module will be uninstalled and its associated data will be removed. Modules that are locked will not have an uninstall button available until they are unlocked.
Installing New Modules

Modules need to be installed before they can be used in game worlds. There are three ways to install modules for Foundry VTT to use: through the installer menu, with a manifest url, and by manually placing the module files in your user data folder.
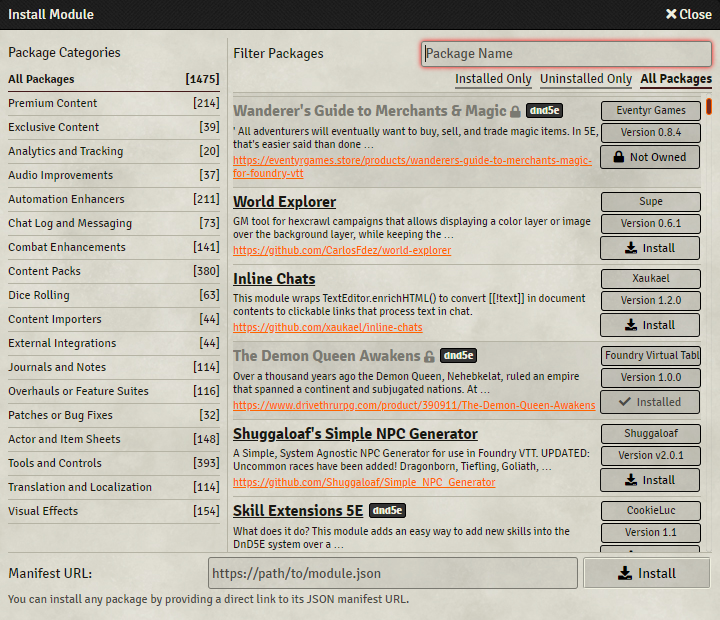
To install a module from the official repository click the Install Module button in the Add-on Modules tab to open the module browser.
This browser contains a list of all available modules hosted on or approved to be part of the official Foundry VTT repository. From this list you can click the install module button for an individual module, which will cause Foundry to download and install the module. This may take several minutes depending on the size of the module, but a notice will appear when the installation is complete.
Modules that are already installed will be indicated as such and grayed out.
Paid premium content modules which need specific content keys will be listed as "Not Owned" if you do not have access to the content. Premium content you have purchased needs to be applied to the account which owns the foundry license being used to appear as owned in the module list. These content keys are activated through the main website for Foundry.
See Premium Content for more information on this.
In some instances modules you will want to install will not be part of the core Module Repository and will instead need to be installed using the module.json file. In these cases you will use the Manifest URL box at the bottom of the install module window. To do this, simply paste in the web url ending in module.json and click install to begin the process. Once complete a notice will appear indicating success.
In some instances the provided JSON may not include the necessary information to install the module properly, and will result in an error. When this occurs, double-check that the url is correct, and that the module author has provided a valid module.json file for Foundry.
Installing a module manually is not recommended for users as the installer or manifest methods are more reliable and are unlikely to result in modules failing to load correctly. Regardless of that, it is not especially difficult to manually install modules to Foundry, but does require manipulating files on the hosting machine. To install a module manually, place the folder containing the module's data and module.json file into the data/modules/ folder in your user data folder. If Foundry is running, it must be restarted for the software to recognize and load the new module.
Activating Modules

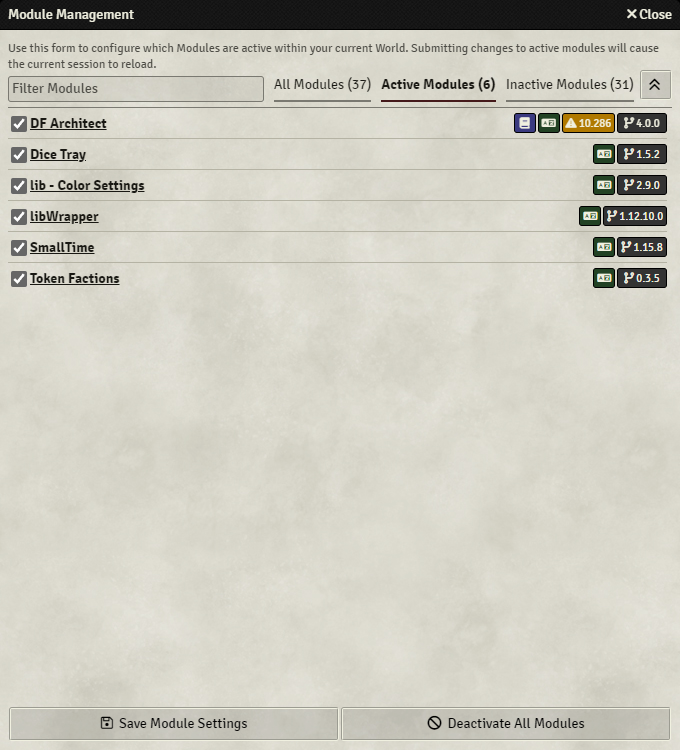
Modules can only be activated from within a loaded and active game world. To activate a module, load a game world and log in as a user with gamemaster level permissions. Then, from the configuration sidebar ( icon) select the Manage Modules button. This will open the module management panel. From here you can see all currently available, active, and inactive modules.
To enable a module, tick the box next to the module name and then click Save Module Settings. This will reload the world with the selected module active in the game world. If the module has any listed dependencies it needs to function, you will be prompted to enable them as well. If these dependency modules are not present you will need to install them.
To disable a module the process is identical, but requires you to uncheck the active module you no longer want loaded. This will reload the world as normal, removing the unwanted module in the process. If the module has dependencies, you will be asked if you want to disable them as well. This is only advised if you have no other modules that are reliant on those modules as well.
You can also use Deactivate All Modules, which will uncheck all active modules in the list for you. You will still need to save these changes to fully unload the modules, however.
Configuring Modules
Many modules include built-in settings which can be adjusted to customize and fine-tune how the module functions. These settings can be found in the Configuration Settings. This will provide a list of settings available to adjust based on the world's currently active modules, and will have its own filter setting available. Details on what these settings do is determined by the module and its author.
Modules that do not have adjustable settings will not have settings appear in this list.
You can read more about this in Game Settings.